12x24 Garage Shed Drawings - How To Ensure You Do It Right

Use short stakes to locate poles. Begin by examining how water moves and collects in your yard. Take this 2x4 and snap a chalk line down the middle of it on the flat side. Our outbuilding sits on top of two 16' skids that in turn sit on top of 6 concrete patio blocks to raise the skids off ground. Finish the curved trim piece by first cutting angles on each end, and then sawing the curves with a jigsaw and sanding them smooth. This, however, requires a bit of preparation in advance. (https://shedconstructionplans.com/10x16-saltbox-shed-plans-blueprints) Align one edge of a standing joist with the appropriate layout mark on the sill plate.
Without the blocking, floor trusses can twist and warp below the subfloor, causing an uneven floor. During this project you may find it easier to disassemble the outbuilding and reassemble it. Because our example 5x8 shed is 5' in depth, third timber rail in middle was not necessary, but was installed to further reduce deflection. Then run a 3 inch screw through bottom plate into truss on both sides of stud like before. Cut joists and nail them to rim joists. You can also build skids by gang-nailing together three or four 2x6s or 2x8s and setting them on edge.
But as with gravel pads, they have advantage of full load contact-allowing the outbuilding floor supports to be in continuous contact with the foundation, rather than spanning as with blocks or concrete piers. Measure height from center piers to their respective beams to determine the (from this source) position of shoulder segment on center posts. Repeat the installation procedure and install remaining blocks at midpoint line of floor joists. Just take a tape measure and measure diagonally from one corner to other. Keeping your outbuilding out of direct sunlight during hottest part of day is a smart move. Consider adding overhangs to the ends of your shed.
However, before getting started, be sure to submit plans to local building department and get a building permit. The rafter ties also fill roles of floor joists in attic space and ceiling studs in rooms below attic. This is considerable for a small shed. A detailed spec sheet accompanies delivery of the floor trusses. Hold the door hinges in place and mark mounting-hole locations. This was advised by the vendor of the green roof. Shed dimensions dictate how large an area you need. Remember, you need to add for the ridge angle segment plus thickness of wall when selecting length of dimension lumber to use.
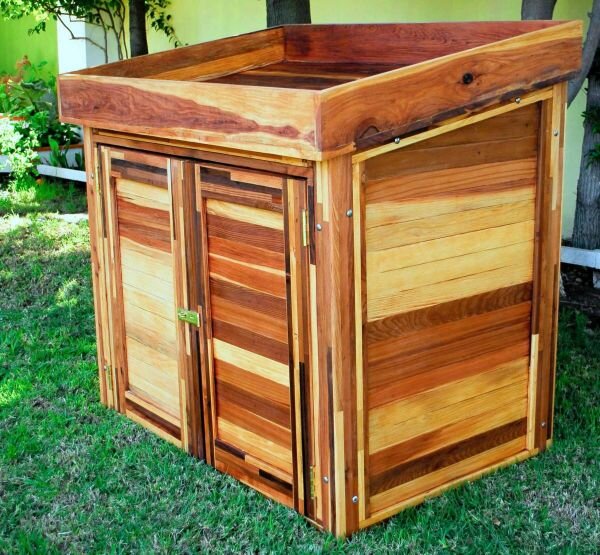
Cut out door opening, the siding that is segment out would be used to create door. If the height is over 8 feet, use 10 foot lumber for the studs. You have double doors to front, so you can have a wide access. If you have extra information or any questions, please let us know. Now adding a bracket for bolt to extend through. If you are looking for more outdoor plans, check out the rest of our step by step projects and follow the instructions to obtain a professional result. The 6-foot overhang extends the working area outside. In my area we have a heavy predator load.
Anything from 3 to 6 feet could use double headers and posts, but beyond 6 feet you need to use triple headers and triple posts. The piles have flat U brackets that the beams sit in and bolts that attach beams to screw piles. The use of an adze or axe in finishing the wood left ridges and a rustic appearance. Place remaining trusses over the vertical blocking, secure them with screws, and install plywood deck and shingles. If you are like me, you probably have a reasonably good idea of how to build most of your shed. Attach the hinges with 3 inch lumber screws.
Paint wood preservative onto cut ends of beams before you bolt them down, and countersink the nuts and washers so walls will slide on easily. As long as you could swing a hammer, tighten a screw, and maybe use a power saw. Cut three pieces of 100x25 horizontal braces the same width as the rectangular panel, arrange them in their right places and screw them to the door slates. Clear the building site and level obvious high spots. Once you align bolts, you're golden. It's important to have at least one window for lighting but don't get frustrated by the cost.
The yellow posts are side posts. These two tools are almost universally needed for any type of project, and are more than sufficient for building a small outbuilding like this.